Friday 9 December 2011

Re(Calibrator) Phase8

Recently, Rapid Prototyping (RP, also referred as 3D printing) is becoming a more accessible technique for quick fabrication of a computer generated part or assembly. I decided to try it with the geometry that I have been developing, which would give me a tangible representation of the new structure.

The mesh view of the improved geometry
In order to go ahead with the Rapid Prototyping, the entire geometry of what I have designed so far needed redesigning. I had to make sure that none of the components is thinner than 0.1mm; otherwise those elements would have collapsed during the "printing" process.
The latest geometry in glass
The RP process, is also known as the layered manufacturing, since this is exactly how the solid object is "printed" with the help of layering. The RP chamber uses a particle dust; a thin layer of that powder is spread on top of the printing surface and an inkjet printer then deposits tiny amounts of the binder solution (this is controlled by the software). This solution binds the dust particles only in the places where it is needed, thus creating a 3D object.
RP of the improved geometry (painted in sliver)

It is true however, that the RP fabrications are generally test products, as the RP materials usually do not have enough strength or durability. In very few cases only, the RP models are the end products.

RP of the initial geometry (left in its original off white material)
Having said that, there is an emerging trend towards RP in different materials, such as the experiment conducted by the team of engineers and artists at University of Washington.

Powdered glass RP by University of Washington
At the Solheim Rapid Manufacturing Laboratory of Washington University, this team has developed a technique, which they call Vitraglyphic process, which allows them to print tiny particles of glass powder. http://www.physorg.com/news173022660.html  The team came up with a new approach for both the dust and the binder. At this stage, the end product does not look much like glass, however it held together and fused when heated in a kiln. Needless to say that the Washington technique is just one of the explorations of the massive potential of RP fabrication, however at the moment it remains a very expensive and a limited method. 
The desired glass structure to be achieved
The glass structure that I am pursuing, would retains its translucent, reflective and refractive qualities, and I am hoping to achieve this combining the 3D modelling, RP and craftsmanship.

Saturday 3 December 2011

Re(Calibrator) Phase7

Digital software gives an immense freedom of exploration and generation of complex forms, that was previously unavailable. It also gives an opportunity to imitate real materials such as wood, gold etc as well as create new and imaginary digital materials with exaggerated luminosity, translucency etc. My recent experiments with Z Brush have been around the digital materials.
The digital human skin
In these examples, I was contemplating on the use of an unlikely building material like the human skin.
The digital "ear" terrain
The digital skin structure
I have also tried something of the world of graphic novels; the skin of the famous Dr. Manhattan character from 1980s "Watchman". He was a physicist who was accidentally disintegrated in an Intrinsic Field Subtractor and was transformed into a blue-skinned omnipotent being, consisting of only atoms and pure conciousness.
Dr. Manhattan surface
In the early stages while generating the first variations of the main geometry, I have been thinking about the glass, its qualities and its potential for detail. The fluidity of glass and its response to light is profoundly fascinating.
The digital glass
It is curious that the only glass, that is formed naturally , is a result of a high-temperature incidents such as volcano eruption or lighting striking, that causes the rock to melt.
Volcanic glass
Apart from its magnificent qualities, there is another reason why glass fascinates me so greatly; the glass making technique is very ancient, thousands of years old, and yet, there has been little change in the basics of hot glass techniques in particular. The glass artists are exceptional craftsmen, with a through understanding of physical and chemical characters of glass and very few gain a good control over the formation of hot glass and glass blowing in particular. I do want to experiment with potential relationship of digital fabrication and traditional glass making.
In architecture, glass is commonly used in uniformed and utilitarian ways and careful consideration is given to its thermodynamic and transparent qualities.
Glass artist Dale Chihuly is one of the most well known innovative glass makers, who create very intricate and extremely complex geometrical clusters of blown glass in massive scales. (http://www.vam.ac.uk/content/articles/b/behind-the-scenes-chihuly-chandelier/?utm_source=V%26A-website&utm_medium=redirect&utm_content=int-chihuly-desktop-wallpaper&utm_campaign=ugc-rev-nov11)

D. Chihuly at V&A
Evan Douglis architectural studio is one of the contemporaries who are interested in the synthesis of ornamental forms and emerging fabrication techniques. In their Brooklyn emporium Choice in Dumbo, the architect created a new modular ceiling from a series of sixteen primary building components that were computer-designed and3-D printed.
Moon Jelly glass chandeliers by E. Douglis 
Suspended from the construction are 45 hand-blown glass chandeliers – named Moon Jelly, the bubble-shaped pieces are like “fireflies that float underneath the night sky, ”according to Douglis – and add the final baroque flourish to this otherwise minimalist interior.    http://www.core.form-ula.com/2010/05/27/evan-douglis-moon-jelly/

These inspiring examples show that there is a much more versatile and imaginative way of creating space with glass and the key may lie within the use of the emerging technologies such as the 3D CNC and 3D printing techniques.


Tuesday 29 November 2011

Re(Calibrator) Phase6 part2

In search for a different analogue technique, I paid a visit to a contemporary jewellery design studio, to test wax working methods on a small scale sculpting. The wax modeller Sarkis showed me how to carve and shape a piece of wax into delicate components.

Carving wax, tools and techniques
Sculpting small components out of wax
This was very much the opposite world to architecture, where everything is on such a micro scale and where the 1 millimetre really does make a difference. Z-Brush workflow has many similarities with this process as they both do not use an internal armature for structural consistency, as we had in case of the clay. However with wax modelling the heat can be a big factor when it comes to altering the geometry, attaching or detaching certain compounds to the main block. In this sense, the Z-Brush geometry appears to be very abstract, very far from the real world conditions of heath, electromagnetism and other forces.

Saturday 26 November 2011

Re(Calibrator) Phase6

Z-Brush, as I have mentioned before, is a digital sculpting software and as such, I speculated that it should bare some similarities with the analogue sculpting technique that has been around for so many decades. To find out, I decided to get some hands on experience with clay modelling and made some interesting observations.
1. Z-Brush by default works with an initial material called MatCap Red Wax, which was very similar looking to the actual clay, and it had the same tactile feel to it.
Conventional Earth Clay
Z-Brush default material similar to clay

2. When manipulated with move or scale tools, the ZBrush model behaves just like a real physical clay model, without changing its physical "weight/integrity" it stretches across the respective axis/force.

Manipulating the clay with hands and tools
Deforming the Z-Brush material with graphic tablet
3. There are certain sets of tools/brushes, to work both with clay and ZBrush models. There are numerous amounts of these tools and they all produce different effects. The differences are, while working with clay, you keep a close eye on your instruments, in case of the ZBrush, on the other hand, you do not actually see the brushes.
Carving tools of a clay artist
Z-Brush brush set
4. Any clay model needs an infrastructure, a sort of a skeleton that is the basis for the clay to put on later. ZBrush model however is supporting itself.

Clay model supported with a wireframe
Z-Brush model unaffected by gravity or any other force
Now, in order to create bigger sculptures, the structure of the clay model is filled in with lightweight material, such as paper, fabric etc so that the final model does not weight too much, since clay is a heavy material on its own.
Shaping the form with the chicken wire
This was a great exercise to compare the digital and analogue methods of sculpting. The latter is of course very physical and has a very immediate impact on a sculptor, as the millions of sensors located on human hands create a whole array of rich information about the form that immediately reaches the brain. There is also the temperature and smell factors of the real time hand sculpting that is absent in the digital world. It is also true that the digital sculpting program requires certain intelligence to be able to use the software in the first place, whereas anyone who is illiterate with technology and use of computers can create something out of clay. The digital sculpture never dries or cracks and it does not need to obey the gravitational low. However, I am more interested in the synthesis of these methods, and finding ways to fabricate a computational geometry that will involve an old school craft making.

Monday 21 November 2011

Re(Calibrator) Phase5 part2

Previously, I have mentioned about the Z Brushes having a great potential for generating endless varieties of topologies. While exploring the brushes, I put together a small catalogue of different surface manipulations achieved with the Z depth brushes.
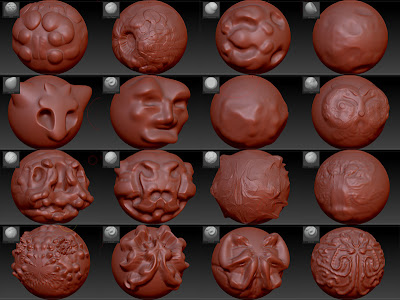
Z Depth brush overview 1
This helped me create a Z brush language and to illustrate the richness of the different forms achievable with Z-Brush.
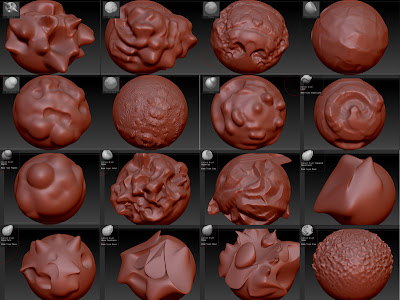
Z Depth brush overview 2
Each brush can be endlessly modified by the inputs of alpha channels, textures, z intensity, the drawing method etc.
Z Depth brush overview 3
This catalogue is not exhaustive at all, in fact this is only a fraction of what really is possible to accomplish with the software.
I have then continued experimenting with the geometry, this time applying more sophisticated techniques and tool sets to the geometry.
                 
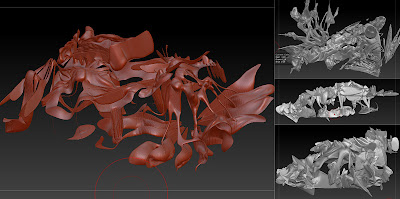
The Surreal Landscape
It is worth mentioning that this kind of geometry creates a very heavy mesh, which any 3D modelling software, including 3Ds Max, Rhino, Softimage etc will find very hard to cope with, due to the enormous number of polygons created in the process.

The mesh view in 3Ds Max 
However Z-Brush works with complex shapes with no problem, regardless of the number of polygons, because every time it renders the object as 2D rather than 3D and the brushes are working on a "flat" part of the object every time, while creating a depth/thickness. This is the core difference of Z-Brush and this enables for a highly detailed modelling that is practically impossible with any other well know 3D package, that works on a mid range computer.
Smooth and tessellated
The black fabric mesh
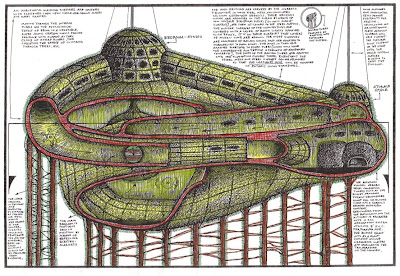
When I was working on these geometries, I have been drawing inspiration of architectural works by Frederick Kiesler, Paul Laffoley, Kathryn Findlay and Eisaku Ushida.
"The endless house" designed by Kiesler has always fascinated me with an overwhelming wonder, as I stared on the flowing "endless" lines of the house and the shapes would come to life in front of my eyes in a dynamic whirlpool.
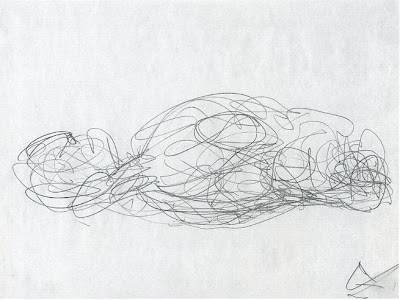
The Endless House sketch by F. Kiesler
The sketches of Kiesler are really scribbles, this technique, he thought, was "the natural way of creating architecture, that is uncorrupted by human will" (page 57, Twenty buildings every architect should understand, Simon Unwin, 2010)There is indeed much interactive movement and such freedom in those curved spaces. The reason the Endless House is called endless, is because there is a continuous flow of the lines, where all ends meet, like that of a human body, where there is not really a beginning or an end.
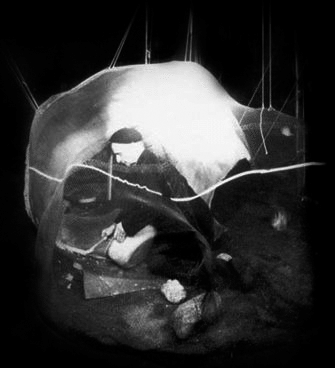
Kiesler working on a prototype of the Endless House
All ends of living meet during twenty-four hours, during a week, a lifetime. They touch one another with the kiss of time. They shake hands, stay, say goodbye, return through the same or other doors, come and go through multi-links, secretive or obvious, or through the whims of memory. http://dprbcn.wordpress.com/2009/09/21/endless-house-frederick-kiesler/
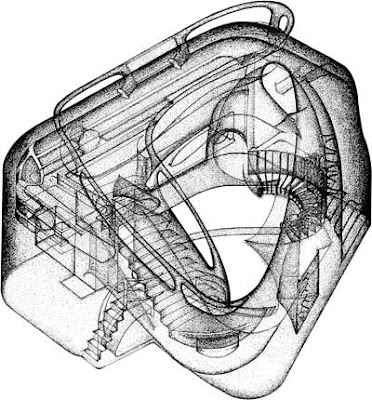
The most finished drawings of the house
Although Kiesler worked on this concept for a long time, and many prototypes have been generated, the house was never built, but this "elastic", "organic" "endless" shell definitely influenced many architects since then.
Perhaps one of the best examples of this is the Truss Wall house, designed by K. Findlay and E. Ushida some 45 years after the Endless House. The Truss Wall house was built in suburbs of Tokyo in 1993.
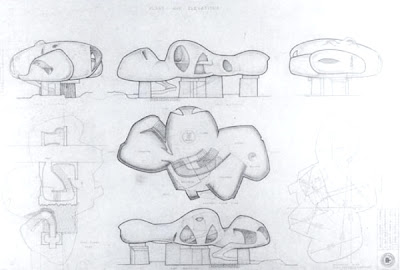
The Truss Wall House drawing
Surrounded by rectangular geometry of suburban villas, the Truss Wall house curiously stands out. The main basis for its construction was the method of spraying the concrete on the armature of steel reinforcement. http://www.ushida-findlay.com/project/truss-wall-house/

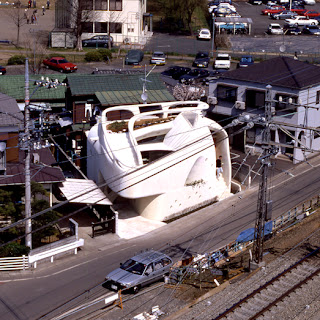
The house amongst the orthodox builldings
These buildings bring forward the question of the relationship of the human movement and the form of the building where they inhabit. Somehow, such spaces suggest a more human like, alive, dynamic and customised lifestyle. On the other hand, perhaps nowadays it is much easier to generate similar organic looking unorthodox forms with the help of technology.
The "Das Urpfanze Haus"(Homage to Goethe) designed by Paul Laffoley, also bares similarities to that of Kiesler's early concept of the endless house.
Das Urpfanze Haus by P. Laffoley
But Laffoley’s house is completely different, he suggests that this is a home which would grow from seeds. 
It is evident that all these forms bare conceptual affinities with Mobius Strip and the Klein Bottle, as they have a single curved topological surface that wraps around itself and intersects itself in three dimensional space.

Thursday 17 November 2011

Re(Calibrator) Phase5

With Z-Brush created geometries, I started looking into innovative ways of representing a 3D sculpture, using unexpected materials. Hence, I looked into so called non-Newtonian fluids, which change their viscosity or flow behaviour under stress. If a force is applied to such fluids (for example, if one hits, shakes or jumps on them), the sudden application of stress can cause them to get thicker and act like a solid, or in some cases it results in the opposite behaviour and they may get runnier than they were before. Remove the stress (let them sit still or only move them slowly) and they will return to their earlier state.
Here are some videos that will spread more light on the topic. "Non-Newtonian Fluid on a speaker cone" (http://www.youtube.com/watch?v=3zoTKXXNQIU)


More information on these fluids can be found here http://www.sciencelearn.org.nz/Science-Stories/Strange-Liquids/Non-Newtonian-fluids
And some more fun from Discovery Channel "Time Wrap Non Newtonian Fluid" (http://www.youtube.com/watch?v=S5SGiwS5L6I)


I have been contemplating on creating the Z-Brush geometry out of this fluids, employing ultrasonics.
Other highly interesting fluids I came across are the Ferrofluids. These are colloidal liquids made of nanoscale ferromagnetic, or ferrimagnetic, particles suspended in a carrier fluid (usually an organic solvent or water). Each tiny particle is thoroughly coated with a surfactant to inhibit clumping. Large ferromagnetic particles can be ripped out of the homogeneous colloidal mixture, forming a separate clump of magnetic dust when exposed to strong magnetic fields. The magnetic attraction of nanoparticles is weak enough that the surfactant's Van der Waals force is sufficient to prevent magnetic clumping or agglomeration. Ferrofluids usually do not retain magnetization in the absence of an externally applied field and thus are often classified as"superparamagnets" rather than ferromagnets. (http://en.wikipedia.org/wiki/Ferrofluid)
In the video below, a steel sculpture with changing magnetisation is coated with ferrofluid. The fluid is pulled in the direction of increasing flux density and forms peaks, which become smaller in higher flux density. At an accumulation of fluid at ridges, the flux density at the surface decreases. The flow and the distribution of the fluid can be observed at several characteristic locations. The author is M. Lobjinski. http://www.youtube.com/watch?v=XUz1ZI-w6LQ


I am hoping to bring these into my project by exploiting the relationship between these fluids and vibrations. And the best thing is perhaps some hands on experiments. Below is an image showing the beginning of some experimentations with ferrofluid.

Ferrofluids experiement
Meanwhile, I have conducted some detailed research revealing the scientific narrative of ferrofluids. Several types of magnetic fluids arise with FHD; the principal type is colloidal ferrofluid. A colloid is a suspension of finely divided particles in a continuous medium, including suspensions that settle out slowly. However a true ferrofluid does not settle out, even though a slight concentration gradient can become established after long exposure to a force field (gravitational or magnetic). (page 7, "Ferrohydrodynamics" by R. E. Rosensweig). A magnetic ferrofluid consists of a stable colloidal dispersion of subdomain magnetic particles in a liquid carrier. The properties of the ferrofluid are profoundly affected by the thermal Brownian motion of the suspended particles and the circumstance that each subdomain particle is permanently magnetized. (page 33, "Ferrohydrodynamics" by R. E. Rosensweig). The basis for the specific properties of magnetic fluid is the possibility to control their flow and physical characteristics by means of moderate magnetic fields with strength in the order of a few tons of mT. (page 14, "Magnetoviscous effects in Ferrofluids " by S. Odenbach).
In the example below we have a demonstration of the magnetic force acting on a ferrofluid. The fluid is attracted against gravity by the pole of a simple electromagnet. The spike structure results from an interaction of magnetic field, gravitational acceleration and the fluid's surface tension. (page 17, "Magnetoviscous effects in Ferrofluids " by S. Odenbach).

Magnetic field applied to ferrofluids
Applications of magnetic fluids are potentially very wide. In this example, we have a mechanical application of a magnetic fluid in sealing of rotating shafts. The fluid is fixed in the small gap between the axis and a surrounding permanent magnet (page 27, "Magnetoviscous effects in Ferrofluids " by S. Odenbach).

Mechanical application of ferrofluids in sealing

Another example, where a loudspeaker is cooled by a magnetic fluid kept in the magnetic gap around the voice coil. On the right side the temperature of the speaker is shown as a function of its power with and without the use of ferrofluid as cooling agent (page 28, "Magnetoviscous effects in Ferrofluids " by S. Odenbach).
Loudspeaker is cooled with ferrofluids
Some interesting effects observed in ferrofluids, include the Weissenberg-effect; in strong viscoelastic system the fluid surface is forced to form a spherical drop at the rotating axis (page 114, "Magnetoviscous effects in Ferrofluids " by S. Odenbach).

Weissenberg-effect

Some interesting effects observed in ferrofluids, include the Weissenberg-effect; in strong viscoelastic system the fluid surface is forced to form a spherical drop at the rotating axis (page 114, "Magnetoviscous effects in Ferrofluids" by S. Odenbach).
Another one is this demonstration with an electric current passing through a vertical rod running through a pool of ferrofluid. In first image we have no current present and in the second the current is turned on; the fluid leaps upward and assumes the shape shown (page 143, "Ferrohydrodynamics" by R. E. Rosensweig).
Electric current passing through the ferrofluid
These examples indicate promising new possibilities for creating dynamic, fluid, organic, shape shifting new forms. I am being hesitant about the feasibility and the practicality of such an application in fabricating the desired geometry.

Sunday 13 November 2011

Re(Calibrator) Phase4

Another direction I have been exploring is the "size" of the extra dimension, as String theory talks about them being so small that we can not detect these extra dimensions. In my search to find an appropriate software, that would allow me to freely experiment with the scale factor, I came across Paracloud (http://www.paracloud.com/) which gives enormous freedom to develop complex models. I have done some experiments which will help me produce an animation of potential representation of an extra dimension as in infinitely small scale surface, that appears visible only through a endless zooming.
Paracloud works with a mesh and a component, populating a given mesh with a component, but keeping it relatively simple for generating highly detailed models. In the examples below, I have investigated various geometrical objects as a mesh (with an increasing complexity) and populated them with an element of my initial model.

Octahedron mesh
Dodecahedron mesh                                                                                                           
10 times more complex geometry
Below is an example of a mesh - component scenario, where both elements are taken from the initial 3D model for a test structure.

Mesh populated with an element of the main geometry
Afterwards I put together a rather simplistic animation (using ParaCloud for geometry and 3Ds Max for the animation) "basic animation of Paracloud generated structure" (http://www.youtube.com/watch?v=-SyjVag0qTk&feature=channel_video_title)


This rout may also prove to be slightly irrelevant as was the idea of ultrasonics, since I can not see how exactly I am going to go about linking this to my main research. 


Saturday 5 November 2011

Re(Calibrator) Phase3 part2

After making the digital 3D model of the geometry, I took it into another software called Z-Brush. The main fascination with Z-Brush is the Z depth brushes. Z-Brush is a digital sculpting and painting program, that facilitates the interaction of 3D models, 2D images and 2.5D Pixols. http://www.pixologic.com/home.php
For this reason, Z-Brush is often referred as the 2.5 dimensional modelling tool. This software is like the Mobius Strip of the digital modelling world.
As I have already mentioned, Z-Brush is for digital sculptors and is not at all a common tool for an architect, but used mostly for character designing for game industry, films etc.
Z-Brush character by Majid Esmaeili
Character for "Gears of War" (art director Chris Perna)
So how does it work? Here is a little example: I have created a sketch, and then placed in a Wacom Intous graphic tablet.
A generic sketch placed under the graphic tablet sleve
Afterwards the sketch is "drawn" in Z-Brush using the Z depth brushes. The graphic pen is pressure sensitive, which means the brushes correspond to touch of the hand, thus making the curving and sculpting process very intimate and alive.
Drawing in Z-Brush with graphic tablet
As a result, the digital sketch that is reproduced in Z-Brush, has a depth or thickness, since different Z depth brushes with various Z intensities have been used.
Z sketch with depth
This is the case with working off the 2D geometry, however the same is possible with a 3D geometry, which is what I am going to find out. I have exported the geometry from 3Ds Max and started working with Z brushes to generate some modifications.

3D geometry exported into Z Brush 
It is very curious working on the surface of the existing geometry, with a graphic pen carving into the form.
The same geometry after smoothing with Z brushes 
With varying the resolution and smoothness, I created number of topological "skins" of the geometry.

The "melting down" skin 
The "more solid and fractured" version
The "skin on bones" version
It is a magnificent sensation to observe the immediate response of the change in geometry in accordance to movement of fingers and application of the pressure. It really feels like a real time sculpting, only there is so much less mess.
Another aspect of my research indicates a potential to use the time as the 4th element of the "four-dimensional" matter. These skins might allow me achieve smooth modifications of the surface and create an animated view of the changes, that are taking place during a certain period of time. 
The dynamics of the skins
There is definitely a great potential in experimenting with this software, as it is has an insight into a 2 and a half dimensional space. It enables drawing a two dimensional lines on a 3 dimensional surface with the help of 2.5 dimensional brushes, whilst using the body gesture and hand pressure.